Overview
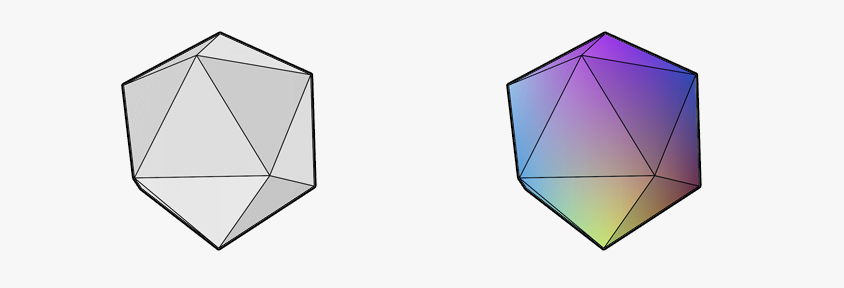
We print using high quality UV inkjet printer with 19-22 microns layer height and acrylic enforced resin that produces both full color or single color prints that matches injection molded parts in visual quality, parts are very strong on thick areas but more flexible on thin areas and the technology can reproduce 10 million colors.
Pricing Info
We price our models based on volume of print and support material needed to produce the part as well as the bounding box as some models takes more time to print due to it's form factor compared to others.
-
• Model volume: The volume of your model is used to calculate the material cost (mm³)
-
• Model Surface
-
• Volume of the support
Typical Use
Great for non-functional parts such as figurines, collectibles, architectural models, memes and display models.
Technology
The technology used to build your design is UV inkjet printing which is very similar to industrial 2D inkjet printing where the material is cured by UV light but instead of printing only in 2D it prints in full 3D layer by layer until it produces the full design with layer height ranging between 19-22 microns , the support material dissolves with water which means higher quality prints, printed models are cleaned up after printing ensuring you get your final model in it's best form.
Additional Information
-
• When your 3D model does not contain textures then you can choose a solid color for printing it (single color).
-
• When uploading your model for full color printing then you need to include all necessary files (OBJ, material and texture files) in a ZIP file.
Design Specification
Wall Thickness
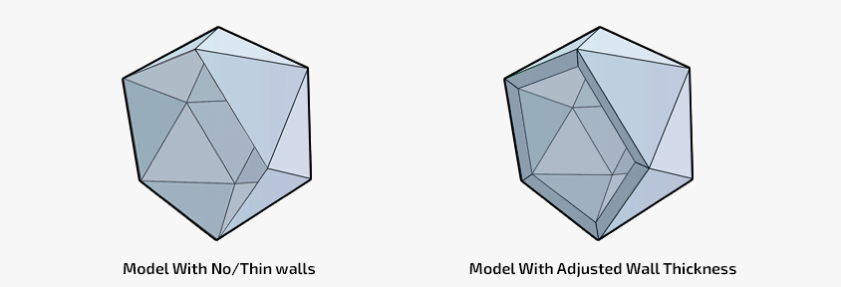
Wall thickness is very important when 3D printing as thin walls or zero thickness walls will cause the print to fail. you must guarantee that your model is thick enough before printing. Wall thickness is the distance between the outer surface of your model and the opposite inner surface. Make sure you use 1 mm is a minimum wall thickness but when you have larger areas then this value must be increased to avoid bending or breakage. Our automatic wall thickness tool will increase the wall thickness of your model to the minimum but won't handle possible bending or breakage due to the design structure.
Hollow Out Your Model
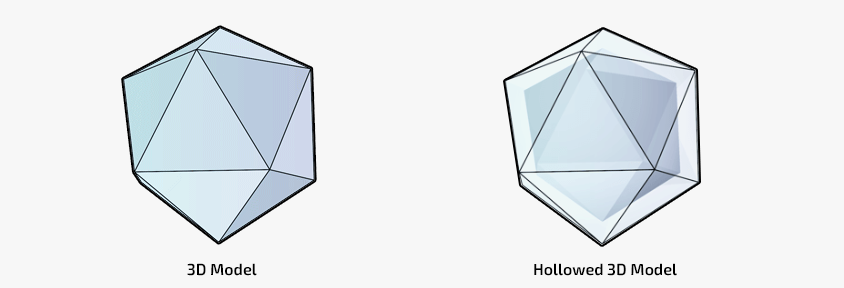
When hollowing your model always maintain at least 1.5 mm wall thickness and you can either create a minimum of two escape holes with a diameter of 10 mm each to get rid of support material or you can keep it trapped inside but take into consideration that if you decided to keep the support material trapped then you should be aware that it melts over time.
Flat Planes Can Cause Warping
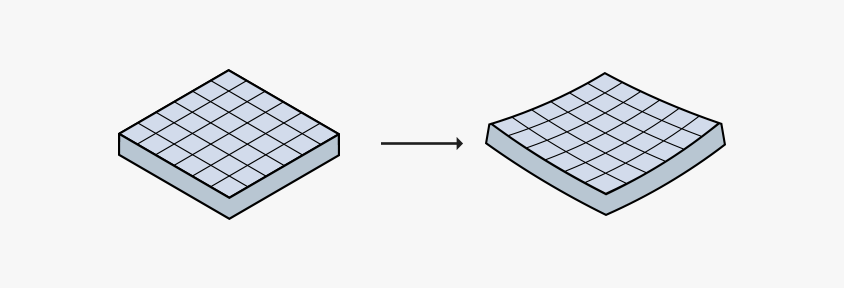
Flat planes can cause an issue called wrapping where the model might deform so it is better to avoid large flat planes or create some sort of lattice or hexagon structure inside while hollowing the model.
The Right Space Between Moving Parts
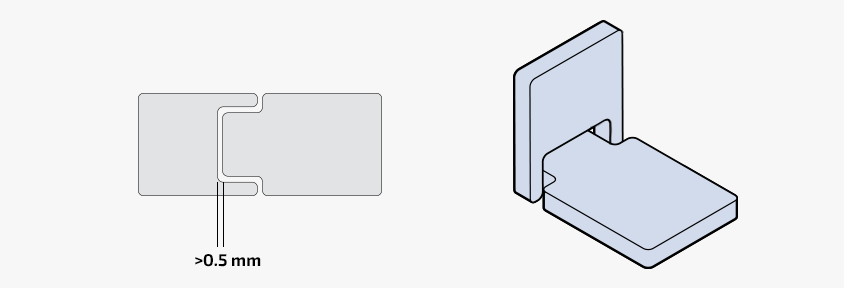
When designing interlocking or enclosed parts then you should consider adding at least 0.5 mm clearance value to guarantee that there is enough spacing between parts as this will determine how much flexibility and\or bend-ability of your design. Complex designs will make it more difficult for the support material to exit the empty spaces.
Assembly

What applies to interlocking and enclosed parts also applies when designing assembled parts as you need to keep enough spacing between the different assembled parts to avoid issues and making sure it fits just right, 0.6 mm is a recommended amount to use.
Textures
If you want to print in full color then make sure you include all textures and materials with your model and as long as you see your model textured and as you expect on our viewer then you should be fine and your model can be printed in full color. We recommend zipping an OBJ with all MTL and Texture files into a ZIP folder then uploading it.
Improving Colors
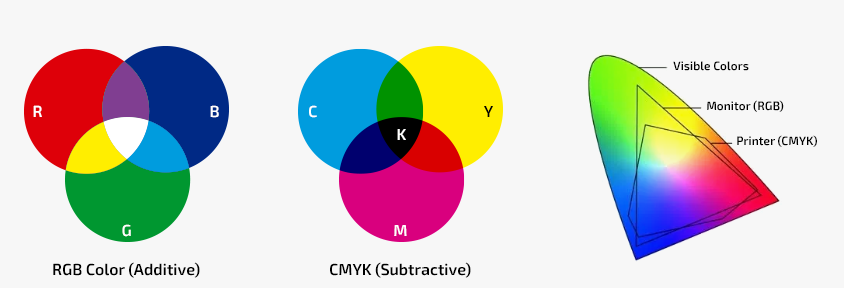
Most 3D programs use sRGB or RGB to represent colors while printers actually use CMYK to produce those colors, this might result in a difference between what you see on your screen (also depends on your screen quality and configuration) versus what the printer will produce. Different gamuts can result in slightly different colors and most likely your design will look darker after printing versus what you see on screen. Increasing contrast, gamma correction and saturation will result in better prints.
Embossed and Engraved Details
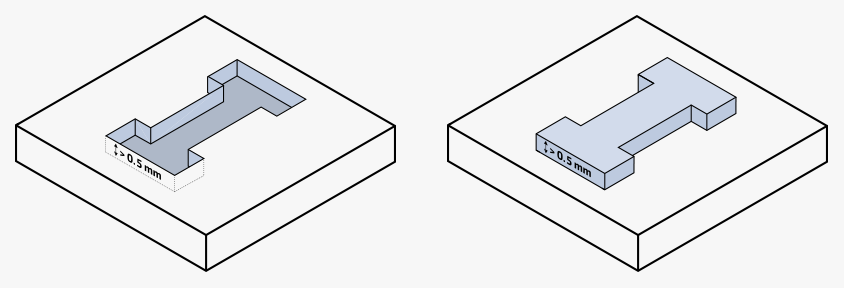
When engraving or embossing features such as text it is always recommended that you use at least 0.5 mm in order for it to be visible\readable.